How to Install Cedar Shingles on a Roof
Are you thinking about giving your roof a classic, timeless look? Installing cedar shingles might be the perfect project for you. Cedar shingles not only add charm and character to your home but are also known for their durability and natural insulation properties. Whether you’re looking to replace an old roof or simply upgrade to something more aesthetically pleasing, cedar shingles are a great option. In this guide, we’ll walk you through how to install cedar shingles on a roof, ensuring that your roof repair project in Richmond Hill goes smoothly and successfully.
What is a Cedar Shingle?
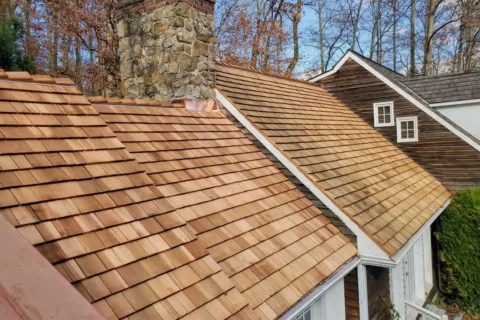
A cedar shingle is a type of roofing material made from natural cedar wood, typically cut from Western Red Cedar or Eastern White Cedar trees. These shingles are thin, tapered pieces of wood that are used to cover roofs and sometimes walls. Cedar shingles are prized for their natural beauty, durability, and resistance to decay, insects, and weathering. Over time, they weather to a beautiful silver-gray color, adding a rustic and timeless appeal to homes. Additionally, cedar shingles provide natural insulation, helping to regulate temperature and improve energy efficiency in buildings.
Why Choose Cedar Shingles?
Before we dive into the installation process, let’s take a moment to understand why cedar shingles are such a popular choice. Cedar shingles have been used for centuries, and for good reason:
Aesthetic Appeal: Cedar shingles have a warm, natural look that enhances the beauty of any home. Their reddish-brown hue weathers gracefully into a silver-gray over time, adding to their rustic charm.
Durability: Cedar is a tough wood that resists decay and insect damage, making it an excellent choice for roofing material. Cedar shingles can last up to 30 years or more when properly installed and maintained.
Energy Efficiency: Cedar has natural insulating properties, helping to keep your home warm in the winter and cool in the summer. This can lead to lower energy bills and a more comfortable living environment.
Sustainability: Cedar shingles are an eco-friendly choice as they are made from a renewable resource. Plus, cedar is biodegradable, which means it won’t contribute to landfill waste when it’s time to replace it.
Now that you’re sold on the benefits of cedar shingles, let’s get started on the installation process.
Tools and Materials You’ll Need
Before you begin, make sure you have the following tools and materials on hand:
- Cedar shingles
- Roofing felt or underlayment
- Galvanized nails (preferably stainless steel or aluminum)
- Hammer or pneumatic nailer
- Chalk line
- Utility knife
- Tape measure
- Ladder
- Safety harness and other protective gear
With everything ready, you’re all set to begin your roof repair Richmond Hill with cedar shingles.
Prepare the Roof
Preparation is key to a successful installation. Here’s what you need to do:
Remove Old Shingles: Start by stripping off the old roofing material. Remove any old shingles or tiles to expose the roof deck if you’re working on an existing roof. Be sure to check for any damage to the roof deck and repair it as necessary.
Inspect the Roof Deck: Once the old shingles are removed, inspect the roof deck for any signs of rot, mold, or damage. Replace any damaged deck sections to ensure a solid foundation for your new shingles.
Install Roofing Felt: Next, roll out roofing felt or underlayment over the entire roof deck. This layer acts as a moisture barrier, protecting your home from leaks. Overlap the edges by at least 2 inches and secure the felt with roofing nails.
Chalk Lines: Using a chalk line, snap horizontal lines across the roof deck. These lines will serve as guides to keep your rows of shingles straight and even. Start by marking a line 7 inches up from the eaves, then continue every 5 inches up the roof.
Lay the Starter Course
The starter course is the first row of shingles you’ll lay down, and it plays a critical role in protecting the roof’s edge from water damage. Here’s how to do it:
Cut the Shingles: For the starter course, you’ll want to use shorter shingles. Cut the first shingle to a length of about 12 inches and the next to 18 inches. This staggered pattern helps prevent seams from aligning, reducing the risk of leaks.
Install the First Shingle: Position the first shingle at the bottom corner of the roof, with the thick end facing down. The bottom edge of the shingle should overhang the eaves by about 1 inch. Secure the shingle with two nails, placed about 1 inch above the butt edge and about 3/4 inch from each side.
Continue the Starter Course: Continue laying shingles along the eaves, ensuring each one overlaps the previous shingle by at least 1/2 inch. This overlap creates a tight seal that prevents water from seeping under the shingles.
Install the Main Courses
Once the starter course is in place, it’s time to move on to the main courses of shingles. This is where your roof will start to take shape.
Stagger the Shingles: As you start each new row, be sure to stagger the shingles so that the seams don’t align with the seams in the row below. This staggered pattern not only looks better but also adds to the durability of the roof by minimizing potential leak points.
Position the Shingles: Place the first shingle of the second row directly above the first starter shingle, with a 5-inch exposure. Secure it with two nails, just as you did with the starter course. Continue adding shingles across the roof, maintaining that 5-inch exposure for each row.
Cut the Shingles as Needed: When you reach the edges of the roof, you may need to cut shingles to fit. Use a utility knife to trim the shingles so they fit snugly against the roof’s edge.
Continue Up the Roof: Keep working your way up the roof, row by row, until you reach the ridge. Take your time to ensure each row is level and evenly spaced.
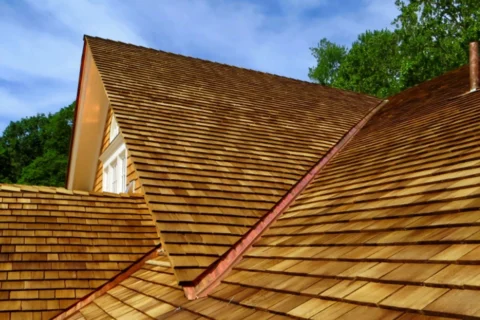
Install Ridge Cap Shingles
The ridge cap is the final step in your installation process. These shingles protect the peak of your roof from water infiltration and give it a finished look.
Cut the Ridge Cap Shingles: Cedar ridge cap shingles are usually narrower and thicker than regular shingles. Cut the shingles to the appropriate size, about 12 inches long.
Bend the Shingles: Ridge cap shingles need to be flexible enough to bend over the ridge. If your shingles are too stiff, soak them in water for a few hours to make them more pliable.
Install the Ridge Cap: Starting at one end of the ridge, place the first shingle so it overhangs the ridge by about 1 inch. Nail it in place with two nails on each side of the ridge. Continue adding shingles along the ridge, overlapping each one by about 1 inch until you reach the other end.
Finish the Ridge: The final shingle on the ridge should be cut to fit and secured with nails. Be sure to seal the nail heads with roofing cement to prevent leaks.
Inspect and Maintain Your New Roof
You’ve successfully installed cedar shingles on your roof. But the work doesn’t stop there. To ensure your roof remains in top condition for years to come, regular inspections and maintenance are essential.
Regular Inspections: Inspect your roof at least twice a year, especially after severe weather. Look for any loose or damaged shingles, and make repairs as needed.
Cleaning the Roof: Keep your roof free from debris like leaves and branches, which can trap moisture and lead to rot. Gently clean your roof with a soft brush or a leaf blower.
Treating the Shingles: Over time, cedar shingles can become discolored or start to show signs of wear. Treating the shingles with a wood preservative can help protect them from the elements and extend their lifespan.
Professional Roof Inspection: Consider hiring a professional for an annual inspection. A professional can spot potential issues that you might miss and provide advice on how to keep your roof in great shape.
Final Thoughts
Installing cedar shingles is a rewarding project that can significantly enhance the beauty and value of your home. While it requires some time and effort, the result is well worth it—a durable, energy-efficient, and stunning roof that will stand the test of time. If you’re in the Richmond Hill area and not quite up to the task of installing cedar shingles yourself, don’t worry! Roof repair and installation can be complex, and sometimes, it’s best to call in the professionals. Whether you’re dealing with minor repairs or a full roof replacement, a trusted roofing contractor in Richmond Hill can help ensure your project is completed with precision and care.
Ready to transform your home with a stunning cedar shingle roof? Contact DVR Roofing today for expert roof repair in Richmond Hill, and let our team bring your vision to life with craftsmanship you can trust. Your dream roof is just a call away—reach out now!\
You can also check out our Cedar roofing services below:
If you’re dreaming of a roof that’s not only durable but also exudes natural charm, cedar roof shingles might be the perfect choice for you.…
When it comes to choosing roofing materials, cedar shingles are often a top pick for homeowners seeking a balance between aesthetics, durability, and…